Setup
Tropf-Blumat: how to set-up correctly
Initial Complete Set-up (suggested)
1.1 Before the set-up:
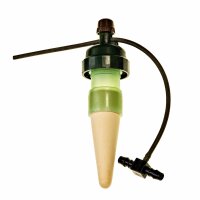
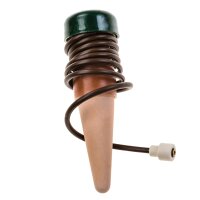
- Unscrew the watering head, soak clay cone approx. 10-15 min. (cone should be completely saturated)
- Reattach watering head while submerged (seal tightly)
- Soak for another 15 min. (to equalize pressure)
- Insert into the pre-dampened soil (water thoroughly beforehand)
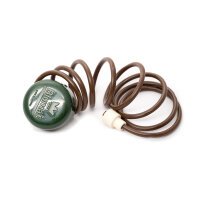
- Position the drip tubing to the desired dripping distance (as determined by protruding length of drip tubing), normally about 8 cm
- Shut-off all Tropf-Blumats (turn brown screw on the watering head)
- Connect Tropf-Blumat onto the 8 mm-water supply hose and turn on water supply
1.2 Now adjust:
- Carry out soon after completing preparations, begin at the last Tropf-Blumat
- Open brown adjusting screw on the watering head until a stream of water is emitted (for deaeration and flushing)
- Then close screw until a drip of water barely remains hanging on the dripper
- Wait another 2-3 seconds, then repeat fine adjustment. The drip tubing should not drip (this is the zero-point setting)
- Close screw by 2 markings (general advice for setting immediately, based on experience).
1.3 Check settings after 1-2 weeks of use
- Sensor should cause dripping to stop after rain or watering occurs! (For example, control 1 hr. after rain.)
- Correction: plus/minus 0.5 - 1 marking
Tip - especially for Maxi
2.1 Before setting-up:
- As described above, see 1.1 (soak, seal shut, insert and turn off)
2.2 – Adjusting, but first after a waiting period:
- Wait at least 10-12 hours, maximum 20-24 hours, depending on water consumption and starting time > recommendation- start late afternoon and wait over night!
- As described above, see 1.2 - (flush, then adjust until a drip of water barely remains hanging on the dripper)
- Leave setting as it is, do not close further! (Sensor is aware of the current moisture level.)
Settings for Advanced Users or for Maintenance
After 2nd year or for new installation
3.1 Before the set-up:
- Maxi Blumats remain in the soil, Standard-Tropf-Blumats are normally removed, as long as the tubing is long enough to allow for removal
- However, all units remain attached to the system and the water faucet stays open; the soil should be well moistened!
3.2 Now adjust:
- Unscrew watering head and open to flush, check dripping distance (standard approx. 8 cm)
- Set zero-point without bottom part attached (Drip should remain hanging! also see 1.2)
- Close further, based on own experience > maximum + 4 markings
- Alternative- set zero-point after a waiting period (see 2.2 above),
- However, then do not change settings, do not close further (corresponds to normal maintenance)
- or if less moisture is desired, it is possible to close further
- Fill both types of Blumat to the rim.
- For Maxi-Blumat: immediately tightly screw-on watering head (remove drip tubing from the head to prevent twisting and to straighten tubing)
- For Standard-Tropf-Blumat: tightly screw the bottom part onto the watering head (keep bottom part in an upright position);
insert sensor back into the soil – same location, however, place a bit of loose soil into the hole;
insert the clay cone into the soil by turning (good contact to substrate important).
Improving Sensor Condition (Maintenance, Correcting Errors)
When a problem has been discovered during a routine control
4.1 Signs of a Problem:
- Air bubbles in the viewing window are too large (Standard-Tropf-Blumat only) > covering half of window or more (sensor reacts sluggishly)
Cause: incorrect setting (screw closed too much), last maintenance took place a long time ago (also see 4.3) - Soil is too dry or Tropf-Blumat irrigates too long (switch remains on > over watering!)
= usually a result of too much air volume or too long of a dripping distance) - Planting bed is completely dry; for example, herbaceous plants appear wilted or leaves clearly pale green in color
Cause: drip tubing is clogged or water supply has been accidently turned off or sensor is defective (leaking).
4.2 Deaeration, Reactivation:
- Always first check that water is flowing freely through the tubing (see 3.2 and 4.3)
and remove any possible blockage: loosen any deposits by kneading and rolling the tubing and then flushing - Unscrew watering head, fill bottom part only to the rim, clay cone must still be quite damp (also see 3.2)
- Do not make any changes to the settings at this time (wait till after there has been new activity)
If, however, the drip tubing has been manipulated or the dripping distance has been corrected, then it is best to reset, see instructions under 3.2
Careful, if the planting is very dry, then it is necessary to first water soil thoroughly before activating and reinstalling the sensor.
If the clay cone is dry, then soak the bottom part in water for about 15 min!
4.3 Suggested Maintenance (Control)
Check 3 points:
-
Correct functioning of tubing: flowing freely, undamaged (no leakage)
To check function: make note of current status (dripping or not dripping), turn adjusting screw till completely open, allow to flush briefly, then close again and reset as earlier (long drip tubing is more prone to blockage!) -
Sensor function: check that the selected sensors are filled enough,
remove Standard-Tropf-Blumats and check the filling level through the viewing window by holding at an angle,
Tropf-Blumat Maxi should only be checked be unscrewing the watering head (Maxis generally have a longer period between refills) -
Water supply: check function (tap turned on) or tank filled enough (enough pressure)
(Careful, if the first adjustment was carried out with a full tank, then when the water level in the tank is low, the Tropf-Blumat will irrigate later.)
Frequency of maintenance:
In intervals of 8-10 weeks, according to experience or 1-2 times during the growing period (depending on duration). It is also advisable to maintain the system 1-2 weeks before a period of absence.
Customized Settings
5.1 Moderate Moisture Levels
Too much moisture or standing water (waterlogging) is often a cause of damage to plants.
Settings to reduce the moisture levels:
- Turn adjusting screw closed by another 2-3 markings
(This can affect the amount of water in the cone, therefore, it is advisable to deaerate more frequently, or to use a Maxi-Blumat.) - Reduce the distance between the dripper head and drip location (water reaches the cone more quickly, Tropf-Blumat shuts-off faster = less water)
- Operate Tropf-Blumat Maxi with 3-4 cm of extra air volume (slows down irrigation)
- As a general rule, choose the number of Tropf-Blumat per container conservatively.
5.2 Connecting to a Distributer Dripper
Distributer drippers result in – depending upon the number used per row – differing amounts of resistance on the dripper.
- Always adjust the Tropf-Blumat together with the distributor dripper after observing the first distributor dripper following the Tropf-Blumat,
the distance between them is about 8 cm.
5.3 Permeable Substrates
Increasingly, substrates in use are based on compost without peat or those with mineral granulate.
These substrates are very permeable, with the following consequences:
- Good for the plants, no waterlogging, water drains quickly downwards, however, there is minimal sideways distribution.
Unfavorable for drip irrigation (water reaches the clay cone poorly, sensor shuts-off too late, results in excess water!) - Reduce distance between drip location and sensor to 6-7 cm, plan on adding additional Tropf-Blumats depending on container size (for example, 4 Tropf-Blumats in an 80 cm balcony box).
However, do not overly increase the number; first test, and then add more later, if necessary.
5.4 Take Weather Conditions into Consideration
Tropf-Blumat are somewhat “weather-sensitive”; they react to an increase in temperature with a slight delay, the soil becomes a bit drier.
- During a longer period of summerlike temperatures (longer than a week), turn the brown adjusting screw 1 marking counterclockwise (more open). This is assuming that the initial setting was done in the cooler springtime.
- This “warm weather setting” can be returned to the original setting at the latest when the cooler nights of autumn begin- turn clockwise 1 marking to close, otherwise, there is a more frequent risk of excess watering.

